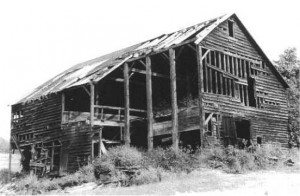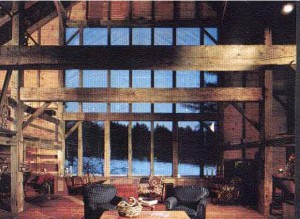
Over the past few years, there has been an increasing awareness of the wide array of wonderful period buildings available for reuse as houses or parts of houses. you may have found the perfect Greek Revival gem that is about to have a new highway put through the main entrance, or you may feel that the hewn texture and beautiful honey brown color of an 18th century barn would make the perfect family room for your new house. Maybe you just want to have the ultimate recycling experience!
Whatever the reason, saving one of these handmade structures can be a rewarding experience. Having moved a number of these structures over the years, I thought I would pass along a few ideas that may forestall some serious heartache to anyone out there contemplating such an endeavor.
Before taking the first measurement or pulling the first nail, there are some important factors to consider:
1. Inspect the frame thoroughly. A very detailed inspection with a good light and a probe can turn up water, insect or structural problems that can turn what seems like a great frame into a restorer’s nightmare. I have seen large timbers, which appeared quite sound from the outside, completely hollowed out by carpenter ants. Be realistic with yourself here. At some point the amount of restoration needed will:
i. Make the job cost prohibitive and,
ii. It will cease being an old frame, and you should save the cost of taking it down and build a new one from scratch, for less money.
2. Do a thoughtful walk around of both the “from” sight, and the “to” sight for overhead wires, trees, proximity to roads and inhabited buildings and drop offs or other physical hazards. Remember, your work sight must have safe room for a crane, man lifts, all the building pieces (it’s a lot bigger than you think when it’s all spread out) and your own vehicles, to say nothing of all those people who will stop to take pictures.
In spite of all these sobering thoughts, if you are still determined to go ahead, the actual process has four distinct phases:
Moving The Timber Framed Building: Documentation
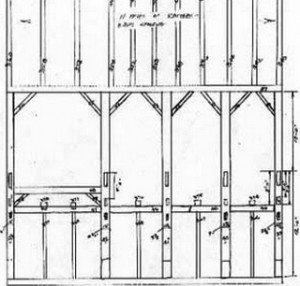
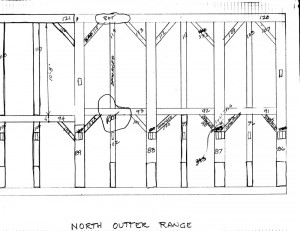
Documentation is the recording of the building, and every part of it, in great detail. Time spent here has tremendous impact on the overall smoothness, hence profitability, of the job. This should be done only when the siding, sheathing and plaster are off the building so that every aspect can be drawn, measured and photographed.
It includes drawing and measuring every wall, floor and roof area of the building. Be sure to label your drawing, not just what the area is, but also what the orientation is. (i.e. kitchen, west wall, looking east).
This is a small, but very important detail. Many wall frames are symmetrical, but the pieces because of being hand made, are not interchangeable, causing much confusion during reassembly.
Number tags are attached to each piece of the building, written in on the drawing and entered in on a master parts and repair list.

A thought on measurements. Remember to engage your brain before starting your ruler.
Look carefully to see if there is anything that might be giving you false measurements. Check, for example, to see if a joint has rotted and caused a post to be displaced. Your dimension should reflect the restored condition, not the “as is”.

This could cause your new foundation to be sized incorrectly.
Well, now that your photos, lists, measurements and drawings are in order, it’s time to get down to serious business.
Moving The Timber Framed Building: Restoration
With the building safely down and sorted, it is time to start the restoration. (I like to do the restoration at the “from” site if possible. The whole thing is freshest in your mind and the debris from demo and restoration can be cleaned up only once.) It would take an entire separate article to properly cover all the procedures possible during restoration.
Basically though, there are two different philosophies of restoration:
1. Make the repair any way you can, let it show and don’t try to match existing material. Some even say it should contrast sharply with the original so there is no mistaking original from repair. This would include steel plates, rods and fasteners.
2. The second approach, which is the one we use most often, is to use period joinery, where possible to make repairs (joining two pieces of timber with a scarf joint and wooden pins rather than two steel plates, through bolted) use of old material for repairs, epoxy only where it doesn’t show and if a metal repair must show, replicate forged iron work.
Both approaches have their merits. We like the later because it is more subtle and maintains the same technology level throughout the visible elements of the building. This is a good place to work closely with your friendly structural engineer, particularly if the repair is in a major structural element or if the use or loading of the building is changing. His input here is crucial.
When all the pieces on your repair list are checked off and test fitted, it is time to transport them to the new site and organize them for assembly.
Moving The Timber Framed Building: Reassembly
When the new sill or deck system is ready, lay out all the smaller parts by type, in reverse order (the last parts you will need on the bottom of the pile, the first on the top) and pre-assemble the larger sections where they will be raised, in the same order. Take a few minutes before you start to review quietly with your entire crew the process you will be going through so that everyone understands what will happen and in what order. This is important because this is a potentially dangerous undertaking, one where things have to happen in a precise order and one fraught with the opportunity for error. It is a good idea to have one person in charge of the procedure, i.e. the crew, crane, etc., and one just identifying the next numbered piece to go up.
This keeps the assembly crew focused on the structure and not distracted by searching the prints and material piles for sequential numbers.
The cross bracing goes back on as the structure goes up. This is important because even with the restored frame, you really don’t have a stable structure until the plates go on.
Once again, I want to emphasize the importance of the proper equipment. A trained crew of five or six with a crane and lifts can not only do the work of twenty, but do it safer and faster.
Moving The Timber Framed Building:
Conclusion

There are so many details about moving a timber frame that they would easily fill a book rather than an article. What I have tried to do here is to cover the procedure as a whole and address the details that I consider critical for a safe and high quality job. There are, for example, as many theories on tagging systems and inventorying parts as there are people doing this work so any system that you come up with, if it works, is just fine. The main thing is that you have a system.
In summary, know what you are getting into, be organized, and work safely. The net result will be that you have saved a bit of history and created a very special hand-made space.